
The purpose of our group’s program is to provide a platform for club leaders and members at Del Norte High School to communicate more effectively. The website streamlines the management of events, announcements, leadership roles, and member organization, creating a centralized space for club activities. It also enables students to discover clubs that match their interests, encouraging greater participation.
Many clubs currently lack a consistent communication platform—some use Instagram, others rely on group chats, while some have no system at all. This website brings all clubs together in one shared space by simplifying communication.
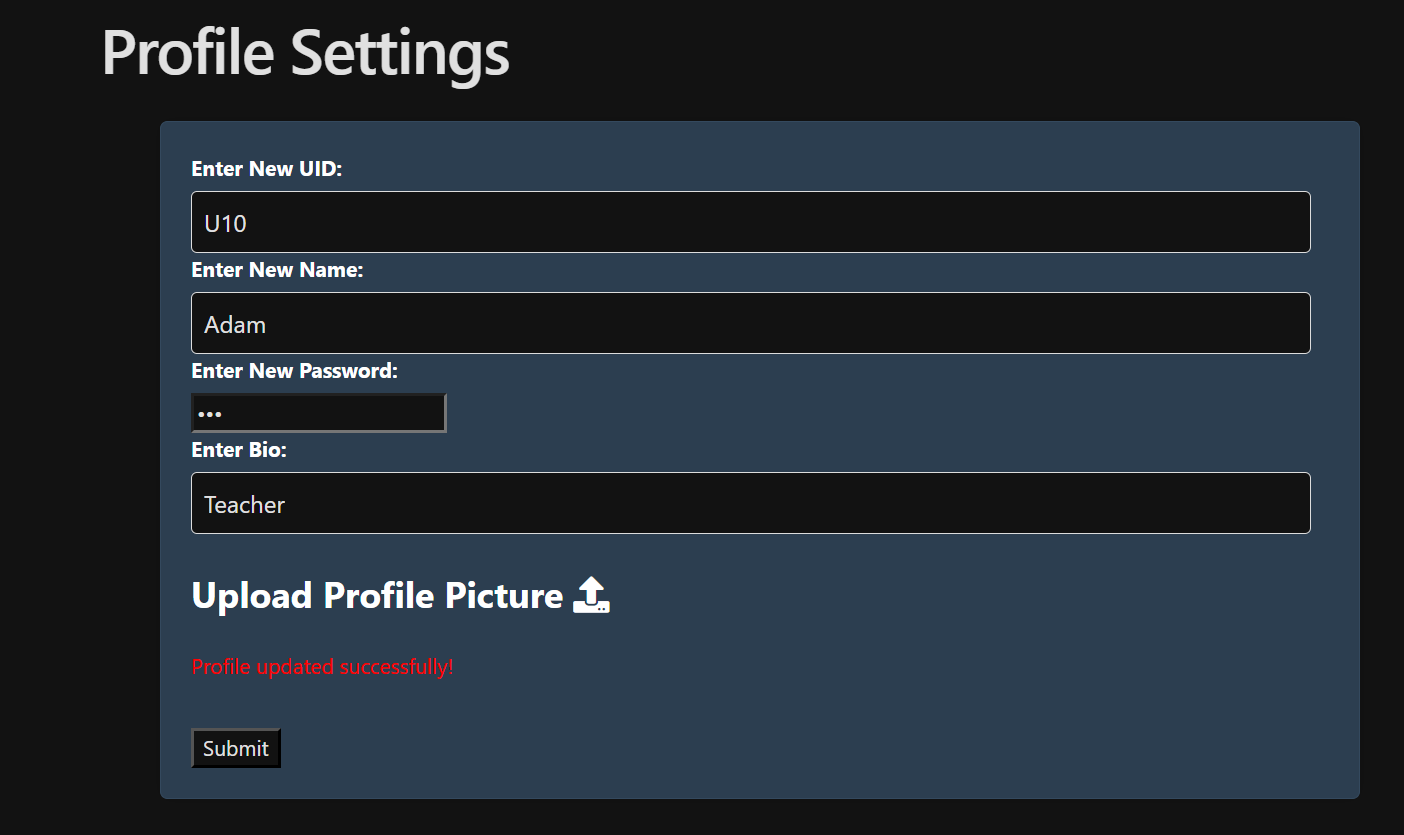
My individual feature allows users to manage their bios within their profiles seamlessly. Users can personalize their profiles by adding or editing their bios, ensuring their information remains relevant and up-to-date. They also have the flexibility to remove outdated bios if needed. This feature enhances user engagement by enabling members to share meaningful details about themselves, allowing for better connections and interactions within the platform.
user_management.db file.
In my Flask project, I used the Bio class to manage user profile data. This class represents database records where each row corresponds to a user profile, and columns store user details such as uid, name, password, and bio.
I worked with lists when handling multiple database rows and dictionaries to structure individual user data for API responses. Using SQLAlchemy, a third-party library, I queried the database and formatted the retrieved data in JSON to be sent to the frontend.
The Bio class stores data in a relational format, where each row in the table corresponds to a user profile. Here’s how it’s structured:
class Bio(db.Model): tablename = ‘bio’ # Change the table name to ‘bio’
id = db.Column(db.Integer, primary_key=True)
uid = db.Column(db.String(100), unique=True, nullable=False)
name = db.Column(db.String(100), nullable=False)
password = db.Column(db.String(100), nullable=False)
bio = db.Column(db.String(500), nullable=True)
profile_picture = db.Column(db.String(200), nullable=True)
created_at = db.Column(db.DateTime, default=datetime.utcnow)

def __repr__(self):
    return f'<Bio {self.name}>'
Lists in Bio Class:
Bio.query.all(), which returns a list of Bio objects.Dictionaries in Bio Class:
In the context of your Flask application, you interact with a database where data is stored in tables (which you can think of as columns and rows). Here’s a breakdown of how your code works with lists and dictionaries when querying and returning data:
Working with Lists (Rows) and Dictionaries (Columns) in the Database:
In your code, the Bio model represents the structure of the database table that stores user profile data. When querying the database, you retrieve rows, each representing a user profile. You then convert each row into a dictionary (representing the columns of the table).
For instance, in the get_profile() function:
@app.route('/api/user/profile', methods=['GET'])
def get_profile():
    uid = request.args.get('uid')
    if not uid:
        return jsonify({"message": "UID is required."}), 400
    # Retrieve the user's profile from the database
    bio_entry = Bio.query.filter_by(uid=uid).first()
    if not bio_entry:
        return jsonify({"message": "Profile not found."}), 404
    profile_data = {
        "uid": bio_entry.uid,
        "name": bio_entry.name,
        "bio": bio_entry.bio,
        "profilePicture": bio_entry.profile_picture
    }
    return jsonify({"profile": profile_data}), 200
filter_by() retrieves the first matching row where the uid matches the request parameter.Here, each dictionary key (such as “uid”, “name”, etc.) represents a column in the database, while the values correspond to the data from that row.
Once you’ve retrieved the data from the database and formatted it into a dictionary, the next step is converting that dictionary into a JSON response that can be returned to the user. Flask’s jsonify() function makes this easy:
return jsonify({"profile": profile_data}), 200
In this case, the profile_data dictionary is automatically converted to a JSON object, with the profile key containing the user’s profile data. This JSON response can then be processed on the client side and rendered into the DOM as needed. This is especially useful for rendering user profiles dynamically in web applications.
Your queries are provided by SQLAlchemy, a third-party library that works with your Flask application to interact with the database. In the case of your get_profile() function, you’re using the filter_by() method to extract a specific row based on the uid. Here’s how it works:
bio_entry = Bio.query.filter_by(uid=uid).first()
Bio.query.filter_by(uid=uid) generates an SQL query that filters the Bio table by the uid column..first() method returns the first result that matches the uid (or None if no match is found).In this section, we’ll break down the CRUD (Create, Read, Update, Delete) operations for managing user profiles, specifically focusing on your Bio model and how these operations are implemented in your API.
The Create operation is responsible for adding new user profiles to the database. If a profile doesn’t exist for the given uid, a new profile is created. This is done in the update_or_create_profile() function where a POST request is made.
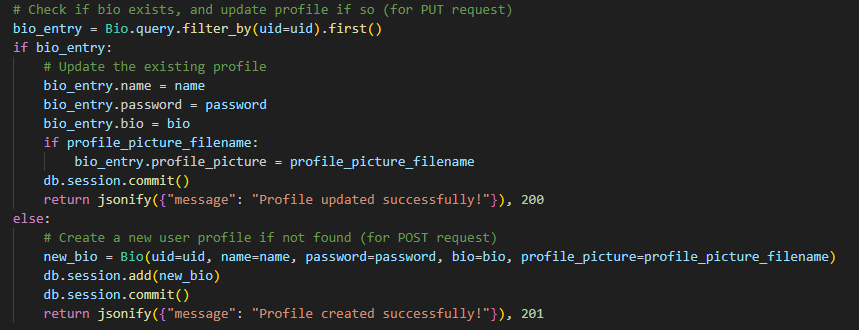
If the profile is not already present in the database, it is created by creating a new Bio object with the provided data (uid, name, password, bio, and the optional profile_picture). The new entry is added to the session and committed to the database.
The Update operation is designed to modify existing profile data. In your case, this is done via a PUT request in the update_or_create_profile() function. If a profile already exists (as identified by the uid), the provided data (name, password, bio, and optional profile_picture) is used to update the existing profile in the database. After updating the profile attributes, the changes are committed to the database.
The Read operation fetches the profile information from the database. In your code, this is handled by the get_profile() function, which retrieves the user profile by uid.
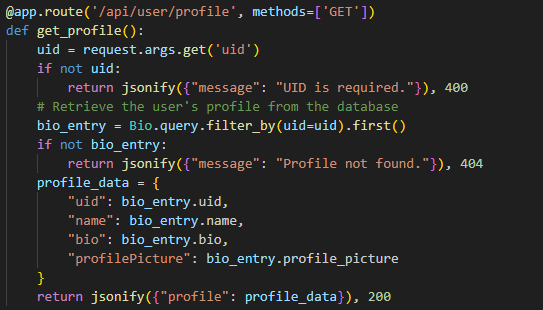
Here, a GET request is made, and it looks up the Bio table for a profile with the given uid. If no such profile exists, a 404 response is returned. If the profile is found, the profile data is returned in the response in JSON format. This code extracts the profile data from the bio_entry object and formats it into a dictionary, which is then returned as a JSON response.
The Delete operation removes a profile from the database. The delete_profile() function performs this action:

It checks if the profile exists by querying the Bio table using the uid. If the profile exists, it deletes the profile picture from the server and then deletes the profile record from the database.
In this section, we’ll dive into the different algorithmic elements and design choices used to handle requests in your Flask API. We will cover the use of code blocks to handle different types of requests (GET, POST, PUT, DELETE), how the API class functions, and how sequencing, selection, and iteration are implemented. Finally, we’ll discuss the request parameters, how data is passed in the body of requests, and how the response is formatted using jsonify().
To handle a request in Flask, we define specific routes and associate them with handler functions that process the request and return a response. Each route corresponds to a method, such as GET, POST, PUT, or DELETE.
For example, to define a route for getting a profile, we use the following code block:

Here, the code block listens for a GET request at the endpoint /api/user/profile. When a request comes in, the function checks for the required uid parameter, queries the database for the profile, and returns the profile data in a structured JSON format.
In Flask, the flask_restful extension provides the Resource class, which helps to organize the handling of HTTP methods (GET, POST, PUT, DELETE). Each method is mapped to a corresponding function inside a class that inherits from Resource.
For example, here’s the API class you use to handle profile picture operations:
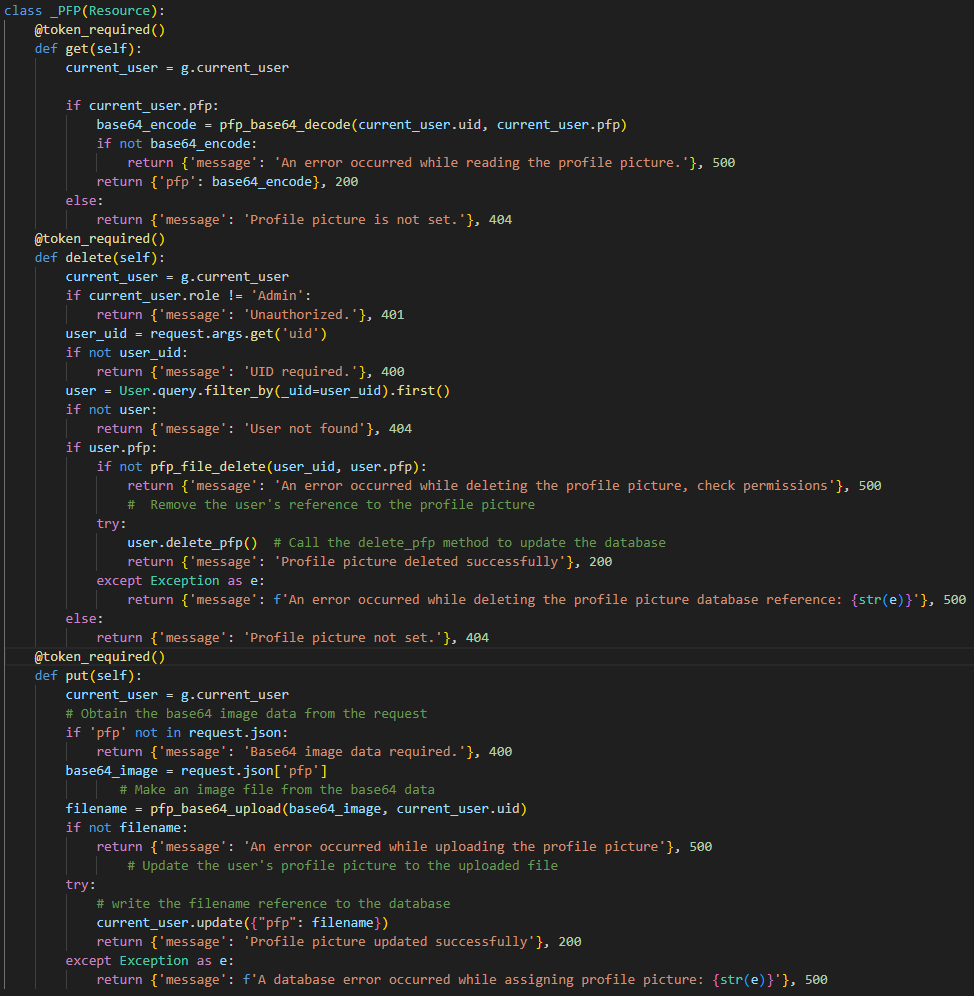
In the above example:
Each of these methods corresponds to a specific HTTP verb and performs different actions on the data.
The logic inside these methods often involves sequencing (steps taken in a particular order), selection (conditional checks), and iteration (repeated actions).
For example, in the put() method for updating the profile picture, we have sequencing and selection:

Sequencing: The steps to validate and upload the image happen in order, first checking the request body and then proceeding to decode and upload the image.
Selection: If the pfp key is missing from the request, the method returns an error message.
Iteration: There is no explicit iteration in this example, but iteration would typically occur if you were processing multiple images or handling multiple users in a list.
The parameters for these functions come from two main sources:
put() method, for example, we expect the body to contain base64-encoded image data under the key pfp:base64_image = request.json['pfp']
delete_profile() function, the uid is passed as a query parameter:uid = request.args.get('uid')
Return Type:
The return type of these functions is always JSON, formatted using the jsonify function from Flask. Each response is wrapped in a dictionary, and the jsonify function ensures the response is properly formatted as JSON.
For example, a successful GET request might return:
return jsonify({"profile": profile_data}), 200
Where profile_data contains the user profile details. The HTTP status code (e.g., 200 for success, 400 for bad request) is also included in the response.
If there’s an error, a JSON object containing an error message is returned:
return jsonify({"message": "UID required."}), 400
This structure makes it easy for the front end to handle the response consistently, checking the status code and displaying relevant data or error messages to the user.
When a user clicks Submit on the frontend, their profile data is sent to the backend and stored in a database. This simple action ties into key development concepts:

os.remove(img_path), and the function returns True.Use SQLAlchemy to query the database and get user data before performing file operations (e.g., retrieving the user’s unique ID and profile picture filename). SQLAlchemy simplifies working with the database by converting query results into Python objects or lists.
Example: Retrieve all users from the database with Bio.query.all() (returns a list of all user records).
The flow involves querying the database to get the necessary data (like user_uid), and then using that data to interact with the filesystem, such as deleting a profile picture with pfp_file_delete().